You need to test, we're here to help.

You need to test, we're here to help.

12 February 2018

Probing Techniques and Tradeoffs (Part X): More Best Practices

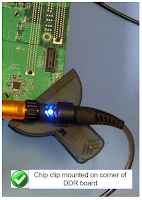
Chip clips; they're not just for snacks anymore
Figure 1: Chip clips;
they're not just for
snacks anymore
In probing circuits, as with most endeavors, there are some best practices you can use to enhance your chances of obtaining optimal measurements. We began exploring this concept in our last post, and we'll continue here with more best practices.

Often, the selective and judicious use of some more-or-less common household items can be of great value. One such accessory is the chip clip, which you'd ordinarily use to keep open bags of snacks from going stale. In a pinch, one of these clips can be pressed into duty, clipping it to the corner or edge of a printed-circuit board or side of a chassis as a third hand. Use these clips to hold or prop up your probe when necessary. It might be the difference between getting a good measurement or the frustration of a broken solder joint.
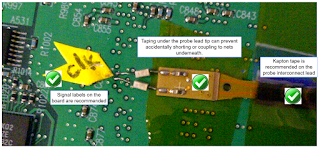
Kapton tape makes for a good insulating layer to prevent probes from shorting accidentally
Figure 2: Kapton tape makes for a good insulating layer
to prevent probes from shorting accidentally
Kapton tape is great stuff with multiple applications for circuit probing. For one thing, it comes in handy for creating an insulating layer underneath probe lead tips. Doing so ensures against the lead accidentally shorting to the board or coupling to other adjacent nets. Kapton tape is also recommended for use on the probe interconnect lead to help hold a probe in place. By the way, don't forget to label signals on the board. Otherwise, it's far too easy to get confused about which point is which (Figure 2).

Avoid hot-gluing the undersides of probes
Figure 3: Avoid hot-gluing the undersides of probes
Another often-used adhesive in probing applications is hot glue. It's great for keeping probes in place, but there's a right way and a wrong way to apply it. It's simply not good practice to use hot glue on the bottom of probes, because it can damage the termination-resistor solder point back onto the probe. Be careful to always apply hot glue on the top side of probes.

Figure 3 shows an example of hot-gluing probe tips to a BGA ball on the back side of a single-sided DIMM. Securing the tips in this fashion facilitates inserting the DIMM into a DDR slot without imperiling the solder joints fastening the probe tips to the board.

Be careful about wrapping tape around the sides of DIMMs; it could interfere with proper seating of the card in a motherboard slot
Figure 4: Be careful about wrapping tape around the sides
of DIMMs; it could interfere with proper seating of the
card in a motherboard slot
If you're going to be probing on a DIMM card, be careful not to probe too close to the card's edges, because the card is going to have to be inserted into a slot and you could inadvertently damage your probe in the process. Further, when it comes to Kapton tape, sometimes too much of a good thing is a bad idea. Avoid applying tape on the sides of the DIMM card. There are notches that hold the clips from the connector and if they're taped over, the DIMM might not be seated properly in the slot.

Next time, we'll begin looking at how to deal with less-than-ideal probing situations.

Previous posts in this series:

Probing Techniques and Tradeoffs (Part I)
Probing Techniques and Tradeoffs (Part II)
Probing Techniques and Tradeoffs (Part III)
Probing Techniques and Tradeoffs (Part IV)
Probing Techniques and Tradeoffs (Part V): Probe Loading
Probing Techniques and Tradeoffs (Part VI): Dynamic Range
Probing Techniques and Tradeoffs (Part VII): More on Dynamic Range
Probing Techniques and Tradeoffs (Part VIII): Gain/Attenuation vs. Noise
Probing Techniques and Tradeoffs (Part IX): Best Practices

No comments:

Post a Comment