 |
| Figure 1: The adjustable equalization circuit on the oscilloscope end of the coaxial cable compensates for the 10x passive probe's inherent low-pass filter characteristics |
Referring again to Figure 1, there's a 9-10 pF bypass capacitor in parallel with the 10-MΩ input impedance at the tip of the probe. High frequencies will pass through the capacitor, and they'll also see the capacitance at the oscilloscope end of the probe cable. The combination of the low-pass response of the series resistor and shunt capacitance to ground and the high-pass response of the compensation capacitor results in a flat, high-bandwidth response overall.
 |
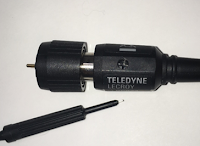
| Figure 2: This trimmer capacitor is the key to flattening the probe's frequency response |
That's why the adjustable capacitor, which is typically found at the end of the cable near the coaxial connector, enables us to change that capacitance so that the time constant for the capacitor and resistor at the oscilloscope input is the same as that for the 9-MΩ resistance and capacitance at the business end of the probe. Once we match those time constants, we achieve the flat, uniform frequency response we want to see.
 |
| Figure 3: Shown are examples of under-compensation, over-compensation, and proper compensation using the probe's trimmer capacitor |
 |
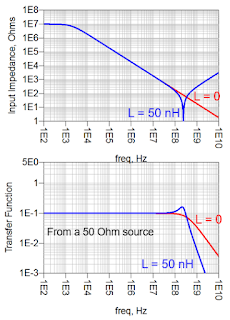
| Figure 4: Input impedance and transfer function plots for a 10x passive probe |
Another complication is the potential for loop inductance between the signal and return paths. The amount of inductance depends on how we make the connection, but it will have an impact on bandwidth. The L and C result in a series LRC response as seen at the probe tip, which will show up as an impedance dip at higher frequencies and in the transfer function (Figure 4).
We've built what is essentially a two-pole low-pass filter that has some peaking in its response, which is why, if there's some inductance in the return path, we'll see some peaking in the hundreds of MHz range. If our source impedance of the DUT is 50 Ω, the nominal drop in transfer function will be flat with a -20 dB attenuation with a -3 dB drop from the passband region at a couple hundred MHz.
It's important to bear in mind that the input impedance is capacitive as we go to higher frequencies, which ultimately limits the bandwidth to the hundreds of MHz range. Any additional inductance in the tip will further decrease the bandwidth and potentially introduce ringing. This is why we always want low inductance in the tip.
We'll continue exploring the performance of the 10x passive probe in an upcoming post.
Previous posts in this series:
Putting Probes in Perspective
No comments:
Post a Comment