 |
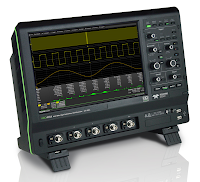
| Figure 1: An example of a touch screen-equipped oscilloscope. |
In fact, in this age of smartphones and tablets, we've become conditioned to expect display screens to have touch capability. So why shouldn't your oscilloscope? For me, one cool thing about the touch screen on, say, a Teledyne LeCroy HDO, is that you don't have to take your eyes off the display to adjust parameters and so on (Figure 1). Sometimes, after a lengthy session of using an HDO, I find myself stabbing my finger at my laptop's screen. No such luck, though!
 |
Figure 2: Shown are the constituent parts of the touch
screen on a Teledyne LeCroy HDO oscilloscope.
|
Let's have a look at the various sections of the touch screen on an HDO (Figure 2). Across the top of the display is the menu bar of drop-down menus, providing access to setup dialog boxes. All of the instrument's functionality is accessible through the menu bar or through other shortcuts. One handy item on the menu bar is an Undo button at top right, which appears whenever the user performs an action that can be undone.
 |
| Figure 3: The HDO's channel descriptor box |
Trigger level (vertical axis) and trigger position (horizontal axis) indicators appear at the right side and bottom of the grid area, respectively. They'll show up when you set a trigger and are color-coded to match the input.
Cursors show where measurement points have been set. You can touch and drag cursors to reposition the measurement point at any time.
 |
| Figure 4: The HDO's timebase descriptor box |
Dialogs appear at the bottom of the display for entering set up data. The top dialog will be the main entry point for the selected function. For convenience, related dialogs appear as a series of tabs behind the main dialog. Touching tabs opens the relevant dialog boxes.
That concludes our brief tour around the touch screen of a modern digital scope, in this case, the HDO. All of the major manufacturers of test equipment approach their user interfaces a little differently, but much of what's been covered here will apply to other brands' touch screens. In the next installment of this series, we'll take a look at how the touch screen functions in practice.
No comments:
Post a Comment