 |
Figure 1: The half-bridge output
current from each DC-DC phase
is known as the inductor current |
An Internet of Things (IoT) device derives its power either from a 12-V DC supply or from a battery. In either case, power is fed to one or more power rails that operate at different voltages. These rails power the CPU and other functional blocks on the PC board. In this post, we'll take a look at how to examine an IoT's power supply for proper digital power management implementation and for power integrity.
Each DC-DC converter within an IoT device typically comprises several discrete DC-DC converters operating in parallel. Each of these converters are known as "phases," or, in some circles, as "channels." For example, a 3.3-V rail might be powered by four 3.3-V converters in parallel, with each supplying 25% of the total output current to the rail.
 |
Figure 2: Shown are some examples of
key measurements of a DC power rail's
transient response, including settling
time, droop, and ripple |
Referring to Figure 1, the half-bridge output current is typically known as the "inductor current" because it flows through the output inductor. The inductor current ramps up when pulse-width-modulation (PWM) signals are on and ramps down when they are off. If phases are switched on or off by the power-management IC (PMIC) depending on the load's variable power requirements, the PWM outputs will be time-interleaved into a single output by the PMIC. Monitoring the inductor current will enable us to capture and characterize any amplitude and phase errors between different phases, as well as any distortion patterns that might result.
 |
Figure 3: An eight-channel oscilloscope can be
an invaluable tool in analyzing the broad picture
in an IoT device with multiple power rails |
A key measurement for IoT power management is the transient response of a given DC rail and its associated PMIC, some example of which are shown in Figure 2. It's important to understand what happens to the rail when a load is instantaneously added or subtracted. This is a dynamic test that's best made on an oscilloscope with deep acquisition memory, which is critical in correlating bus commands with changes on the power rail. We want to ensure that rail characteristics such as mean voltage, ripple, droop, ringing, and settling time are within expected tolerances.
 |
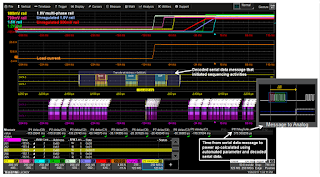
Figure 4: Voltage/power-rail sequence testing is a
critical aspect of IoT device evaluation |
To fully evaluate an IoT device's transient rail response, you will want to capture multiple rails at once and analyze how each behaves in response to a load change. An example of analysis of multiple rails appears in Figure 3. By tracking the mean power value of each rail, we can clearly see each rail's response to a load change. In applications of this nature, the value of an
eight-channel oscilloscope reveals itself. Instruments such as Teledyne LeCroy's Motor Drive Analyzer will time-correlate all of these signals to deliver a comprehensive view of power-rail activity.
For any system to start up correctly, the DC power rails must turn on in a specific order, with a predetermined latency between each rail's power up. Conversely, sequence testing is also critical in the power-down process. Figure 4 depicts an example of how a serial-data message instructing the PMIC to turn on or off the DC rails is captured and decoded on an oscilloscope. The delay in each power rail's ramp up (or down) can be measured against when the message was sent.
In an upcoming post, we'll turn our attention to RF test of an IoT device.
Previous blogs in this series:
Debugging the IoT
Anatomy of an IoT Device


No comments:
Post a Comment