 |
| Figure 1: Oscilloscope UIs such as Teledyne LeCroy's MAUI provide tons of shortcuts and touch gestures |
For example, Teledyne LeCroy's oscilloscopes with bandwidths of 200 MHz and higher are equipped with the MAUI with OneTouch user interface, which makes using an oscilloscope convenient, efficient, and intuitive. The UI performs all common operations with a single touch of the display using gestures you're used to from your phone, such as dragging, dropping, pinching, unpinching, and flicking. We'll discuss a few examples here.
 |
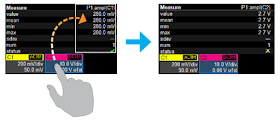
| Figure 2: Copying a channel setup and duplicating it in another is a simple drag-and-drop gesture |
For example, say you have Ch1 set up in a specific way and you want to duplicate that set up in Ch2. You'd simply touch and hold the descriptor box for Ch1 and drag and drop it onto the descriptor box for Ch2 (Figure 2). The same operation would serve to copy setups for math operations, zooms, and parameter measurements.
 |
| Figure 3: Shown is an example of changing the source for a parameter measurement with a touch gesture |
Next, here's how to Add New, with "New" being a channel, math operation, zoom trace, or memory. The Add New box is the area with a plus sign in it to the right of the channel descriptors on the display. You can touch that Add New box, which opens a dialog from which you can choose what New item you'd like. Or, drag a descriptor box onto the Add New button to create a new item.
 |
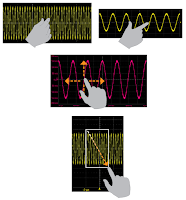
| Figure 4: Pinch/unpinch traces to zoom in or out (top), drag waveforms to reposition them (center), or drag diagonally to create a new zoom trace (bottom) |
There are more general uses for gestures, too, as well as multi-touch gestures. You can use a fingertip and thumb to pinch or unpinch a waveform to zoom in or out. Waveforms can be dragged right or left within a grid to adjust their horizontal positioning or up or down for vertical positioning. You can also drag a finger diagonally across a waveform to create a new zoom of a section of interest. Nearly everything on the MAUI with OneTouch UI can be dragged.
Sometimes it's easier to show something than to describe it, so to that end, we've created a series of 10 short videos about MAUI with OneTouch. Take a look if you haven't seen the UI in action.
In our next post, we'll cover a couple of handy tips for setting the preferences in your oscilloscope.
Previous posts in this series:
Getting The Most Out of Your Oscilloscope: Setup
No comments:
Post a Comment